Let’s be honest, running a self-hosted WordPress site in today’s world is no easy job and can be quite expensive or time consuming. In fact, those who know me would be able to tell that I wouldn’t look beyond WordPress but the hassle of managing the site made me explore various static site generators – so that I wouldn’t have to worry about the security of the website, and I wasn’t ready to pay $300+ per year for one single website (I have bunch of websites that I need to host).
I’m not saying that premium WordPress hosting companies aren’t worth it, I’ve used WPEngine for years to host my sites and have recommended it to hundreds of businesses while running my own WordPress development agency. They add value that shared hosting companies (cheap hosting) can’t offer i.e. security, performance, and good support. But when you’ve got a deal to run a server for $55/year for a 4 Gb ram server (yes, you read it right – per year!) then it makes sense to host your own site for sure! For context on how much I’m saving – I was paying $23/month to Cloudways for a server with 2 Gb ram! That’s a saving of almost $220/year.
Now that you’ve got some background on this website’s hosting – let me share the secret behind running a self-hosted WordPress website that is fast and secure from all the threats that it faces in this nasty digital world!
Table of Contents
Get a VPS – First step for a self-hosted WordPress site
I was lucky enough to get a deal from RackNerd and it’s all thanks to my good friend Matt Stein who alerted me as soon as the deal was out, I was able to get a deal that made a lot more economical sense than Cloudways. I’m being specific to mention that it was more of an economical decision rather than the value that Cloudways was giving me. In my opinion – three managed WordPress hosts that make more sense than anything else out there are
1. Cloudways (My favorite)
2. WordPress.com
3. WPEngine
I would’ve put WordPress.com at the end because they didn’t allow installing plugins earlier – but now that they do and for that they get the brownie points! However, if you are cheap, err – money conscious like me then getting a Linux box from any host will do. And the fact that I got a great deal from RackNerd and so far, haven’t faced any issues – I’d be able to recommend them any day. Although you can choose any non-managed VPS server and this guide will show you how you can easily manage it without burning a hole in your pocket!
Setting up the Linux server
Please don’t let this scare you one bit. Just follow along this guide and you’ll find that managing a Linux server won’t be as scary as you thought it would be.
Install Ubuntu 22+

Most of the VPS servers will allow you to install Ubuntu on your server with few clicks. At the time of writing this guide, Ubuntu 22.04 (Jammy) is available which is the recommended distro from me for this guide. The reasons are –
- it’s supported by Hestia (more about it in the next step)
- It’s my favorite Linux distro since I was a kid in school and Canonical (Publishers of Ubuntu) was kind enough to send 100 CDs to me (for distribution) when I was in India. Yes, there is a bias – but if you can convince me that there is any other company that has done a better job than Canonical to make Linux mainstream then I’m listening carefully.
- Amazing support from not only Ubuntu.com but also countless guides are available from various passionate power Linux users. The support for most of the issues is one Google search away.
Install Hestia Control Panel

HestiaCP, a fork of VestaCP is the best control panel out there which costs nothing (It’s open source) and gives you the peace of mind that nothing else will. You can relax knowing that some of the best security practices for setting up a web server are followed, and the control panel has the most essential features that would be required to manage a Linux based server. You can easily install Hestia with the help of this install script generator.
Set up Two-factor authentication for SSH
It’s an easy decision that you would want to secure your server and even though the password can be compromised, having two-factor authentication gives you that extra piece of mind. I hate to say it, but just today – I got a notification on my phone about my Live.com email address (I hardly use it for anything) that someone was trying to login from Hong Kong – but having two-step authentication just saved the day! You can follow this brilliant article from Linux Babe to install two-factor authentication on your Linux server. It’ll ensure that when you login to your web server through shell, it’ll ask for a code every time.
Setup IPSet blacklist
It’s important to blacklist the nefarious actors by using Hestia’s feature. Even here you won’t have dive into learning iptables to ban the IPs or any other feature like that as Hestia provides a simple to follow guide on how to setup blacklists that are maintained by various generous opensource contributors. Please follow the documentation provided by Hestia for that.
Set up a standard web user and add a domain
Once Hestia is installed, one of the next steps would be to set up a web user. Although it may seem inconvenient, it’s a recommended practice to set up your websites on a standard web user rather than the admin user of Hestia. After the user is setup, you can add a domain through the control panel.
Set up remote backup

Backups are important and it’s important to back-up the site every day, every week, and every month. Yes, setting up backups at different intervals is especially important. Imagine that you’ve set up just a daily backup which gets overwritten every day and one day your site gets hacked (no setup is 100% secure, make no assumptions). And then your hacked site goes through the backup cycle overwriting the clean backup from the day before. In this scenario, you’ll be left with a hacked site and a backup that is of no use. However, with a weekly and monthly backup schedule you’ll have the option to go back and find a clean backup to restore the site.
Backup the whole Hestia user account
Fortunately, Hestia allows you to set remote backups on Backblaze easily and they can be setup by following these steps –
- In Hestia control panel, go to Server (cog icon) > Configure (button)

- In the backup section, you can select Remote and then Backblaze, and then you have three boxes to fill in.
-- Bucket
-- Application ID (KeyID)
-- Application Key

Note: You need to set up a bucket first in Backblaze and issue an Application Key for it.
Unfortunately, Hestia doesn’t offer time based backups, but considering that you get access to root user, one could configure to backup the linux user account at different times. Otherwise, you could also make remote backup within WordPress interface.
Backup WordPress using various plugins
WordPress community offers many backup plugins, each with their own pros & cons. I would recommend choosing any plugin that offers remote backup functionality. These plugins seem to be doing pretty well at the time of writing –
I prefer to use Backblaze, because they started as a backup company, so we are dealing in their wheelhouse, and they are far more affordable compared to any other cloud storage provider. And you can easily access your backups using CyberDuck. Although, you may use any of the remote backup storage options like Amazon S3, Google Cloud, Dropbox, Drive etc.
Setup a secure self-hosted WordPress website
Now, you’ve set up a Linux webserver that is secure and easy to manage, thanks to Hestia. We’ll go into the next phase of this guide and that is setting up self-hosted WordPress, which is not only fast, but secure as well –
Install WordPress through Hestia’s installer
One of the coolest features of Hestia is that it comes with an installer for commonly used web applications like WordPress, Drupal, Grav, Symphony, Laravel and a few more, making it a breeze to install any of these applications. The good thing is that it follows some good security practices when it installs the app on your web server. While, it’s possible to do a WordPress install manually, it’s recommended and easier to use the quick install feature from Hestia.
Secure your self-hosted WordPress install
Security for any site is important, however attacks on WordPress sites are done far more than a regular site and the the popularity of the CMS has the biggest role to play. If a hacker exploits a vulnerability for plugin – then they can easily target thousands of sites which aren’t secured properly. That’s why it’s important to follow good security practices to secure any web application, here’s what is recommended the most –
Setup Web Application Firewall
Web application firewalls are a must in today’s security landscape and without one you are literally giving an open invitation to attackers and hackers to steal not only the web resources but also the important data of your organization and possibly customer’s data. Thankfully, there are tons of options when it comes to cloud based web application firewalls, you can safely choose any of the following WAF services –
- Cloudflare (5 rules are available on free plan)
- Akamai WAF
- AWS WAF
- Sucuri
- Malcare
For this website, I’ve decided to use Cloudflare for the fact that it’s powerful, easy to use and of course completely free to use as well. Although, any of the above solutions would do the job just fine.
Secure WordPress with Ninja firewall plugin
While some may think that WAF may be enough – it’s never enough until you setup multiple layers of security and for your peace of mind. There are a lot of security plugins for WordPress but I’ve personally found Ninja Firewall plugin for WordPress as one of the best in-application firewall for WordPress.
NinjaFirewall is a security plugin that can intercept, scan, sanitize, or block any HTTP/HTTPS request sent to a PHP script before it reaches WordPress or any of its plugins. This means that all scripts located inside the blog installation directories and sub-directories will be protected, including those that aren’t part of the WordPress package. NinjaFirewall can even filter out encoded PHP scripts, hackers’ shell scripts, and backdoors.
Using this very setup, I’ve been able to come up with a website that’s fast and secure. And this pagespeed score would hopefully convince you about it.
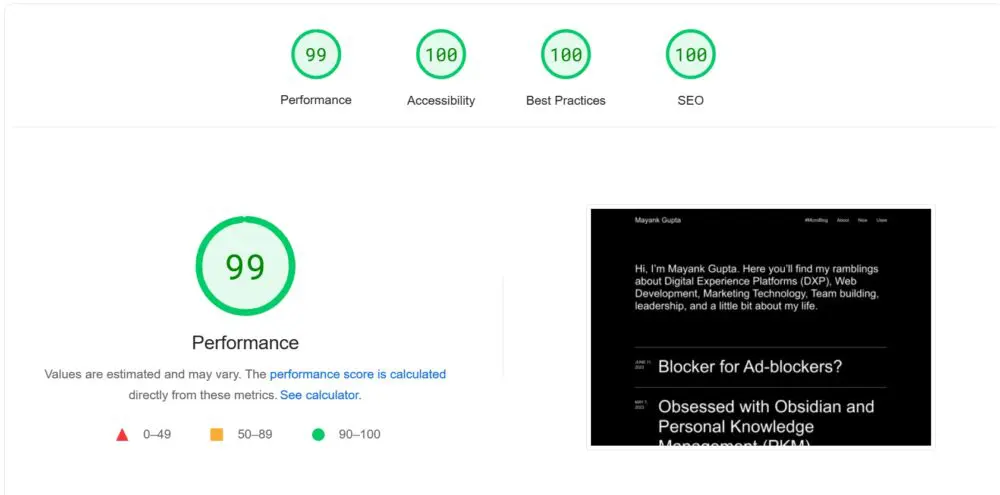
In upcoming posts, I’ll share tips on how you can achieve fast loading pages and how to configure Cloudflare WAF for WordPress.