Table of Contents
I read Emotional Intelligence 2.0 back in 2018, and made a point of deciding I wouldn’t let fear dictate my life. But lately this feeling started creeping in – that lost, uneasy feeling, mixed with the fear of the unknown, and honestly, the worry about AI taking over jobs. It was hitting me and a lot of people I knew.
But remembering I didn’t want to live in fear pushed me to ask myself, what’s actually underneath all this worry? Why am I feeling this way? And it turned out I’d just gotten too comfortable with what I already knew and only focused on growing in the corner of the technology that I was familiar with, stopped pushing myself to learn this new side of the technology. It was time for a change, so I ordered an Apple Mac Studio – time to get up-to-date. You learn to swim by jumping in, right?
The thought was that I need to install these LLMs on my local machine, run various self hosted apps, do automation and what not. Or may be, I just wanted to give myself a reason to buy a new computer – my old iMac was feeling very sluggish any way. (Intel based iMac from 2018).
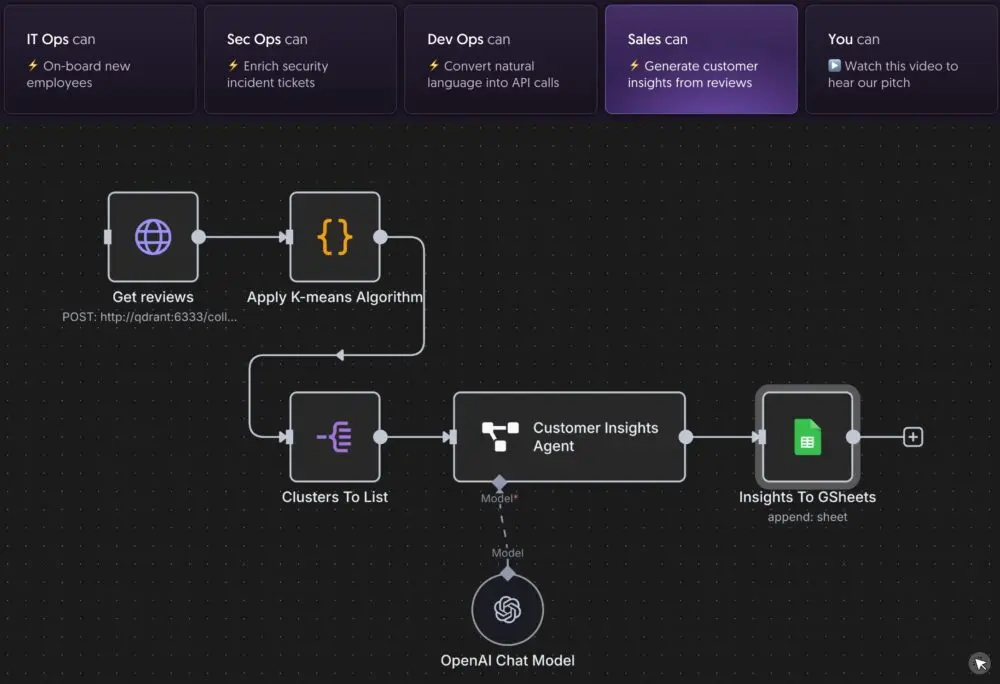
About a week ago – Mac Studio was delivered to me and the first thing I did was (well, after using the migration tool from my old Mac) to install Ollama and n8n (Apparently, the brightest kid on the block when it comes to automation)! And after 1 week of tinkering around – I feel I’ve got the perfect setup to install n8n on an Apple MacOS and here’s why I feel so –
Understanding the GPU Acceleration Challenge on Apple Silicon
The Core Issue: How Apple Does Virtualization
Docker Desktop on macOS uses Apple’s Virtualization Framework to run Linux virtual machines. And honestly, the framework limits applications inside a virtual machine directly use the GPU on your Mac.
What This Means for n8n
Running n8n inside a Docker container on a Mac Studio means you won’t be able to use the GPU for things like:
- Running AI models locally: If you’re using n8n to work with AI models hosted right on your Mac (like for image processing or natural language stuff), you’re stuck with the CPU. No GPU help there.
- GPU-accelerated video/audio: Tasks like video encoding, audio transcription, or messing with images will be way slower without GPU acceleration.
On top of that, you’ve also gotta remember that any commands you need will have to be installed inside the virtual machine. Anything you have installed on your Mac itself won’t be available to n8n.
Docker & AI Models: Don’t Get Too Excited
You might have seen some announcements about Docker and AI models recently. They’ve introduced Docker Model Runner to make running AI models locally with GPU acceleration. But honestly, it won’t let n8n access commands installed on your Mac that need the GPU. For example, you might want to transcribe audio to text with Whisper AI – even if your machine can handle it, it won’t benefit from the GPU because Whisper won’t be able to access it from inside the virtual machine.
The Best Approach: Native Execution
While the n8n team doesn’t officially recommend or support this approach (and honestly, I’m not entirely sure what that means for self-hosting – thankfully, the community forums are a great resource!), I personally believe running n8n directly on your macOS host – outside of a Docker container – is the best way to unlock the full power of your Mac Studio’s GPU and simplify things. Use this guide – it’ll save you a lot of the headache I experienced getting everything set up perfectly!
n8n Installation using NPM (Node package manager)
Install nvm, node and then n8n
To run n8n using PM2, you’ll need a few things installed first:
Node.js and npm: You can easily install both using Node Version Manager (nvm) – check out the instructions here. I highly recommend using nvm as it allows you to run different node versions easily.
node -vn8n: Install n8n globally with:
npm install n8n -gAfter the installation, start n8n by running:
n8n
# or
n8n start
You can then access the n8n Editor UI in your browser by navigating to http://localhost:5678.
Starting n8n with PM2
Once you run n8n as described above, you’ll realize that you are not in a position to close the terminal window. It’s because n8n (or any other such service installed with npm) needs to run in the background and persistently. And for that we’ll need PM2, a process manager for nodejs that solves the problem of running node apps persistently and in the background. To get started –
Install PM2 globally
npm install pm2 -gTo automatically generate and configure a startup script to ensures that n8n will start automatically even after the computer restarts, execute the following command:
pm2 startupThe above command asks you to run another command. Copy and paste the suggested command. The command would look like this:
sudo "env PATH=$PATH:/user/home/.nvm/versions/node/v22.18.0/bin pm2 startup launchd -u <user> --hp <home-path>Once n8n and PM2 are installed, start the n8n service with:
pm2 start n8nThe pm2 save command in PM2 (Process Manager 2) is used to persist the current list of applications and their configurations that PM2 is managing.
pm2 saveYou can then access the n8n Editor UI in your browser by navigating to http://localhost:5678.
Mapping the domain with Cloudflare Tunnels
Till now, we’ve managed to make n8n work and it’ll still work properly with localhost or the IP address. However, I also wanted the freedom to access this application from anywhere in the world and the easiest thing would be to expose n8n securely to the internet with the help of Cloudflare Tunnels.
There are couple of ways of setting up tunnels, which are nicely documented here,
- Through config and
- through the Cloudflare dashboard.
I went with the UI method, however you are free to choose the method that you prefer. Here’s how I setup cloudflare tunnel –
Create a tunnel
- Log in to Zero Trust ↗ and go to Networks > Tunnels.
- Select Create a tunnel.
- Choose Cloudflared for the connector type and select Next.
- Enter a name for your tunnel. We suggest choosing a name that reflects the type of resources you want to connect through this tunnel (for example,
enterprise-VPC-01). - Select Save tunnel.
- Next, you will need to install
cloudflaredand run it. To do so, check that the environment under Choose an environment should be selected as Mac, then copy the command in the box below and paste it into a terminal window. Run the command. - Once the command has finished running, your connector will appear in Zero Trust.

- Select Next.

Note: You can use this same connector to expose various applications by repeating these steps below.
Connect n8n instance
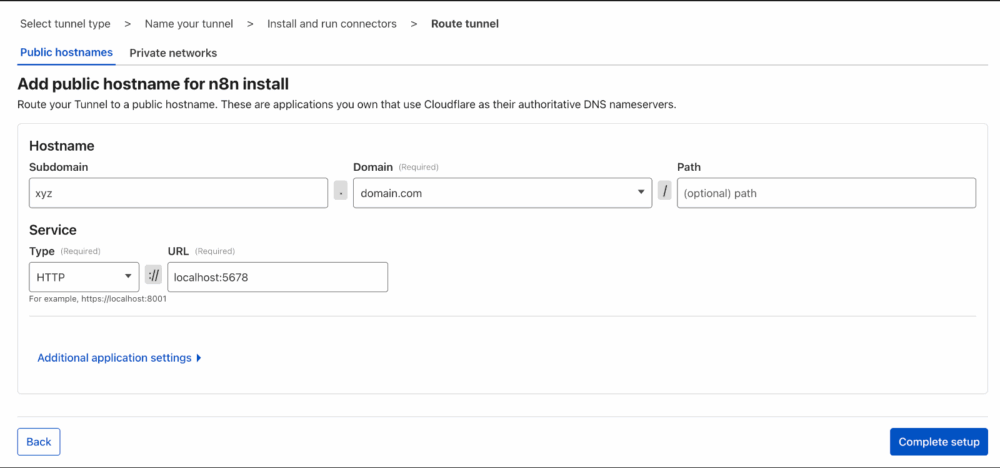
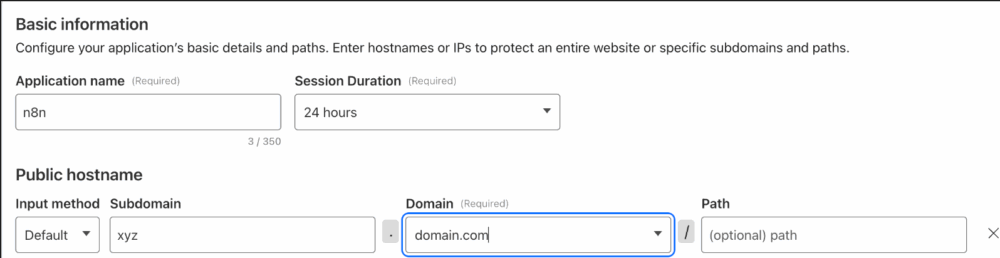
- In the Public Hostnames tab, select Add a public hostname.
- Enter a subdomain and select a Domain from the dropdown menu.
- Specify the n8n location
https://localhost:5678. - Under Additional application settings – I didn’t make any changes.
- Select Complete setup.
Lock it down with Cloudflare Access
Now we’ll focus on how we can limit the access to this shiny new n8n instance of yours, so that only you or the people you want to allow are able to access this powerful application.
a. Configure the identity provider
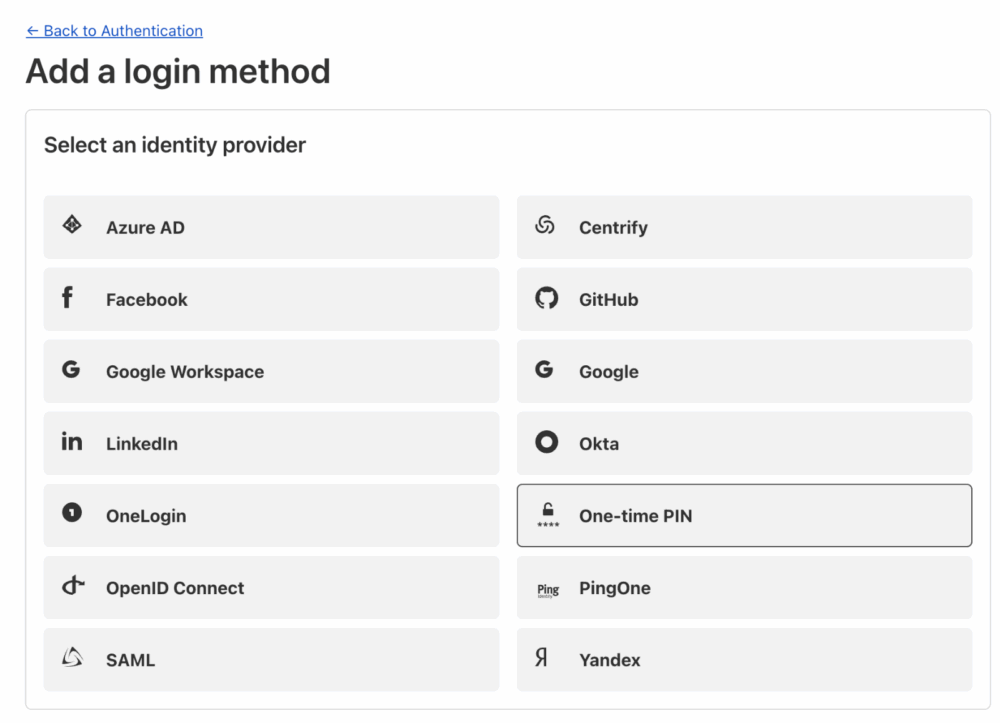
- In Zero Trust ↗, go to Settings > Authentication.
- In Login methods, click Add New
- Select One-time PIN (As shown in the above screenshot)
b. Create Allowlist access policy
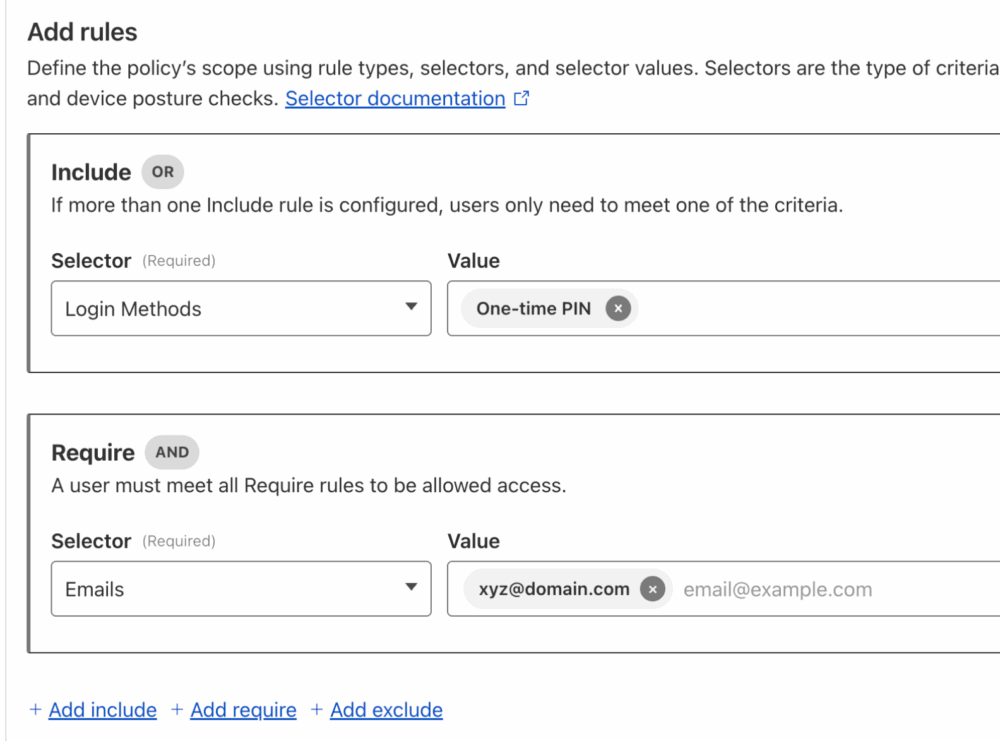
- In Zero Trust ↗, go to Access > Policies.
- Click Add a policy
- Give Policy name as “Allowlist”, or you can choose to give any other name.
- Add an Include rule, with the selector as Login Methods and its value as One-time PIN
- Add a Require rule, with the selector as Emails and its value as your email address
c. Setup the access application
- In Zero Trust ↗, go to Access > Applications.
- Select Add an application.
- Select Self-hosted.
- Enter any name for the application – I chose n8n.
- In Session Duration, choose how often the user’s application token should expire, I don’t want to authenticate too frequently, so I decided to go with 24 hours.
- Enter the subdomain that you configured in your tunnel, choose the right domain.
- Select the
AllowlistAccess policy that we created in the previous steps to control who can connect to your application. All Access applications are deny by default — a user must match an Allow policy before they are granted access. - Select Next.
- Under Block page, choose what end users will see when they are denied access to the application. This is completely optional to configure and depends on your personal preference.
- Select Next.
- Configure Cross-Origin Resource Sharing (CORS) settings – Please note – some of them are based on your personal preferences and not set in stone. Please learn more about CORS configuration here. Please be careful with this, it not helps secure the application, it has to potential to give you headache for hours – i.e. if you aren’t sure what you are doing.
- Access-Control-Max-Age (seconds) – I didn’t set any – please feel free to adjust as per your preference.
- Access-Control-Allow-Origin – I allowed the sub-domain that I chose (in this example xyz.domain.com)
- Access-Control-Allow-Methods – I allowed all the methods.
- Access-Control-Allow-Headers – I allowed all the headers.
- Select Save.
Configuring n8n – important to avoid the headache
n8n allows it’s configuration with the help of environment variables and have documented all the available configuration over here and has documented different methods for specifying the configuration over here.
Set environment variables with zsh profile
My personal preference was to just setup these individual variables by specifying them in my .zshrc file. Below are the configs that i’ve done for my instance till now to ensure that my instance works with external APIs, there are no errors with sockets ensuring that the n8n frontend is constantly connected with the backend.
Of course, you’ll have to setup them up in .zshrc or .bashrc, depending on your preference. However, mac’s now come with zsh by default. Edit the .zshrc file by running the following command –
nano ~/.zshrcAnd paste these config at the end of the file
export N8N_EDITOR_BASE_URL=https://sub.domain.com
export N8N_HOST=sub.domain.com
export WEBHOOK_URL=https://sub.domain.com
export N8N_PROTOCOL=https
export N8N_PUSH_BACKEND=websocket
export N8N_CORS_ALLOW_ORIGIN=https://sub.domain.com
export N8N_DEFAULT_CORS=TRUE

# replace https://sub.domain.com with the domain that you've mapped with Cloudflare tunnels for your n8n instance.
After setting up these variables, reload the new zsh profile by running this command –
source ~/.zshrcAnd finally! run the following command to load this configuration in n8n –
pm2 restart n8n --update-envOther important considerations
- Setup caching rule to skip caching the subdomain configured for n8n
- configure smtp server (helpful when it n8n needs to send you email – say — password reset)
- I haven’t done this – you can always use
n8n user-management:resetcommand to reset the password.
- I haven’t done this – you can always use
- You can also choose to save yourself all this headache and just directly go with this easy and secure n8n deployment with caddy & traefik, but please note – this will use docker in the setup.
If you’ve followed along, then you should have n8n instance running successfully. If at any point you faced any issues or notice any mistakes in the instructions – please feel free to reach out to me on Linkedin or Twitter/X.